Gist:
Create a multi-master kubernetes cluster from the comfort of a shell menu without tweaking a thing. Front the apiservers with load balancer of your choice - namely haproxy/nginx/envoy. Do hassle free back and forth switch between embedded etcd and external etcd.
In this post, we discuss kube-etcd-switch - which is not quite a tool rather a bunch of scripts behind a shell menu that help us to do all the above in a hassle free manner.
Curious? Read on then. But you have been forewarned - it might not be your cup of tea.
Kubernetes treats pods as cattle - they are discarded if not healthy. No effort is wasted on reviving unhealthy pods - instead new ones are created to replace the bad ones.
Kubernetes is conjoined with etcd by an umbilical chord. Etcd stores kubernetes schema and state. Kubernetes is useless without etcd(as things stand currently). At times - it can be quite a challenge to bring up a kubernetes cluster if etcd starts throwing its tantrums. For example - you want to remove an etcd node because it has gone bad - but etcd cluster would not let you do that because the node is not up yet. Quite a vexatious situation to be in.
So, what do we do in such a chicken and egg situation? Well, follow the same kubernetes philosophy - we discard the etcd cluster ( Not the cluster itself - we have compunction - mechanical sympathy. Instead we scrap etcd ) - create a new one to replace the faulty one. We treat everything as cattle - no pets. If a piece of software is not crunching data and providing information - it is not serving its cause - it's redundant. Below we provide a glimpse of how we do that. That is, of course, as long as we have data at our hands, a backup or a snapshot - we care for data - it's valuable - amorphous gold.
First up, we need a kubernetes cluster - kube-etcd-switch can interface with any existing kubernetes cluster - but here we show how to setup a k8s cluster as well because we don't have one at hand currently and we need a cluster for the show to go on.
Requirements: A set of machines (Debian buster/ubuntu16/18/20 flavor) with root SSH access.
Here, we use four machines - one for load balancer(lb), two for kubernetes master nodes(m-1,m-2), one worker(w-1) node.
We run everything from the load balancer node.
1) Clone the following GitHub repository - go inside and launch the 'cluster.sh' script.
git clone https://github.com/ratulb/kube-etcd-switch
cd kube-etcd-switch/
./cluster.sh
We would be presented with menu which has quite a few choices as shown
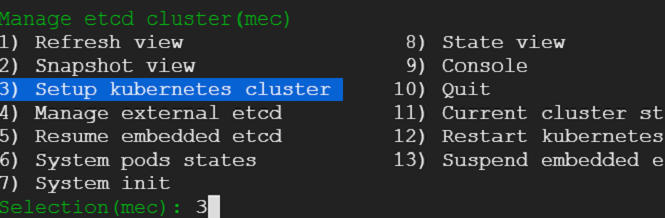
We need a cluster - hence we make the appropriate selection and get on with the cluster setup process driven by the menu choices.
2) We enter the cluster details such as load balancer, master nodes and worker node. Following few snaps capture the steps.
3) Load balancer details
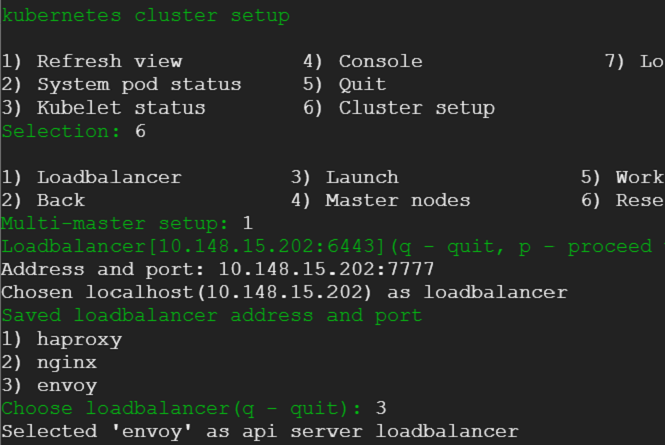
4) Next we enter master and worker details:
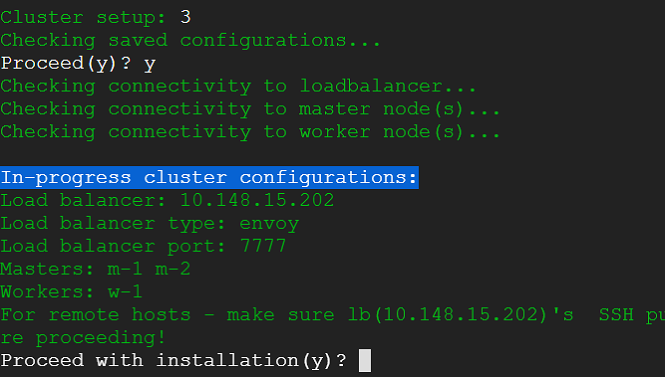
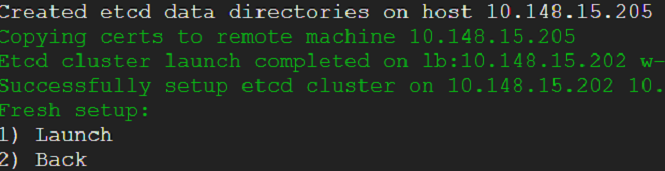
5) Next we select option to launch the cluster creation process. This would provide us with running kubernetes cluster in a matter of minutes with weave CNI plugin and demo nginx pod deployed.
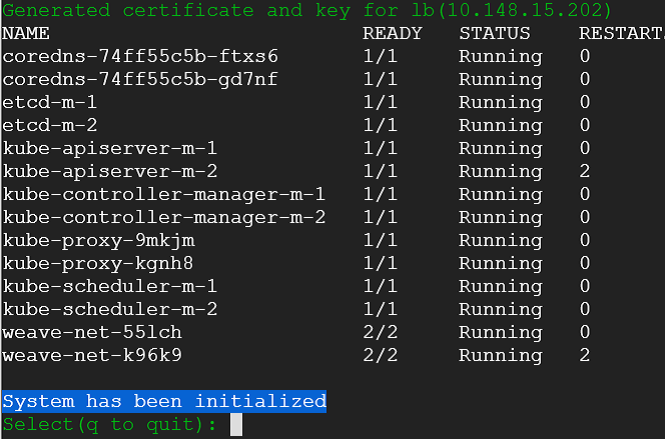
6) Following snap shows the end result of cluster creation:
7) Next is the initialization step. For k8s-etcd-switch to work with any cluster it needs to be initialized first. We need to provide the master IP (or name) of any one of the masters for this. k8s-etcd-switch will query the cluster - gather information such a master members, copy ETCD CA cert and setup kubectl, cloudflare CFSSL and other required binaries to perform its duties. The initialization process can be repeated - it is idempotent. The initialization process is minimum once per servers' certificate rotation. Following snaps show the initialization choices.
Note: Above we see that master endpoints are already detected - that is because k8s setup has already configured kube config. It will not be so for a pre-existing cluster. Initialization would be needed in either case.
8) Post initialization k8s-etcd-switch show cluster's system pod states. Now it can talk to the kubernetes cluster.
9) At this point - our cluster is pristine ( it would not be so for an existing cluster ). Lets go ahead and deploy a demo nginx pod in the default namespace. We select console and deploy the pod.
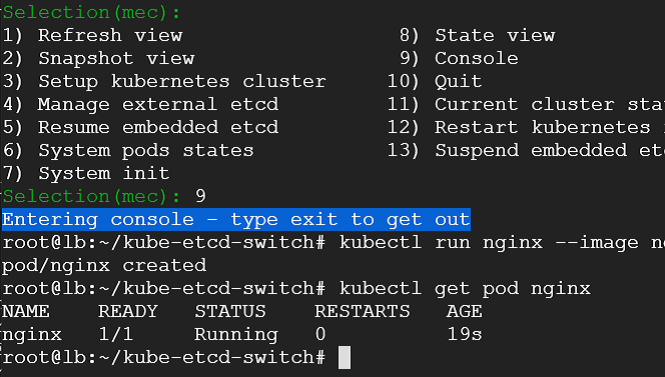
10) We see that our nginx pod is running along with demo pods that were deployed during the cluster creation process.
11) We want to survive cluster failure whether kubernetes or etcd. Kubernetes is done deal - we have shown it above. Etcd would be without it's salt - if it did not have data. But now it has data - whole kubernetes cluster's schema and state - that also contains our freshly deployed nginx pod's information. We need that data - we want to preserve it to survive cluster failure - computation calamity.
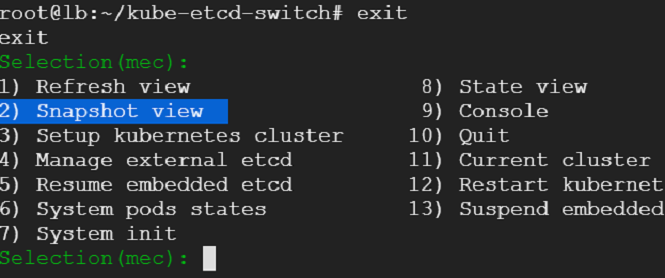
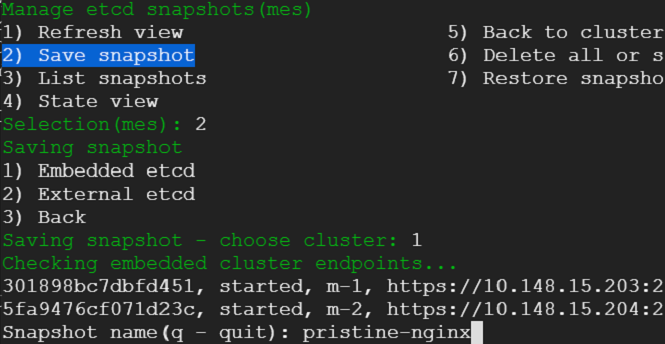
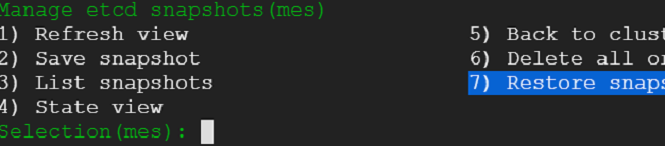
We exit out of the console - that would take us back to where we were before. We select snapshot view from the menu - we would be presented with an option to choose between embedded and external etcd cluster. Presently, we do not have an external cluster. We choose embedded and take a snapshot.
12) With a snapshot in hand - we are safe. We heave a sigh of relief. We are ready to combat disaster. We want put our conviction to test - we want to simulate a catastrophe and survive through it - making ourselves doubly reassured that we can infuse life back into etcd in the event of a cluster failure.
We head back to the main menu - choose console (this can be done from a usual terminal - there is no difference - but we want to be in the context of the menu - hence choose console anyway) and the run the script shown in the following snap. This script will wreak havoc on our cluster - it will wipe out our cluster and render it useless. All data would be expunged. Only the static pods would be running meekly with utter indifference. Had it been a production cluster - business would have come to a grinding halt. Some may be updating their resumes - freshening up on the tricks of the trade. Yet some others may be philosophizing what life is all about - consequences may be far and beyond one's imagination - all due to a failed etcd cluster(pun intended 😜).
Cluster demolition in progress:
Total annihilation:
13) Now that our cluster is decimated, we want to bring it back to life using the snapshot that we had taken. We can - and we would restore the snapshot on top of embedded etcd cluster - but first we would launch an external etcd cluster and restore the snapshot on top of it and verify that api servers are responding as expected.
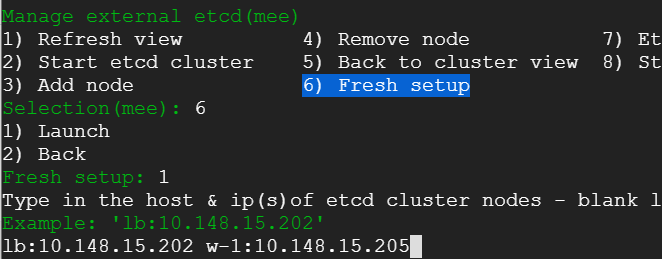
We exit from the console and go back to main menu and choose 'Manage external etcd'

14) We proceed with external etcd cluster setup process. For this post, we choose to host the cluster on the load balancer and the worker node ( Digression: we can also imagine kubernetes master nodes being part of external etcd cluster. For that to happen - the stacked/embedded etcd would need to bottom out one by one giving external etcd space to be hosted as separate processes on the master nodes).
15) The external etcd cluster is ready with required configurations and binaries but not yet started. It would be up once we restore the snapshot.
16) Lets go ahead and restore the snapshot. Following snaps capture the steps. We go back to snapshot view and select restore option.
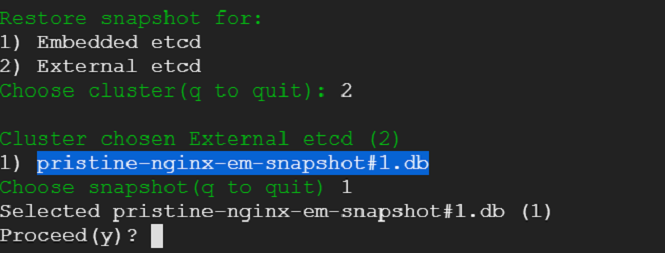
17) We choose external etcd as target cluster and select the snapshot that we had saved earlier.
18) We see snapshot restoration on external etcd cluster in progress.
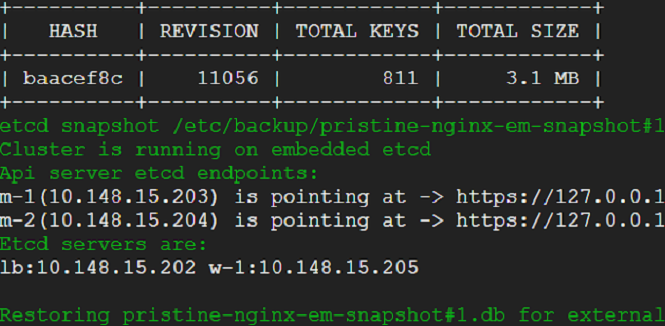
19) Snapshot restoration on external etcd cluster is complete and system pods are up and running in a couple of minutes.
20) We have survived a disaster without a scratch. That was easy! Lets go ahead take out an etcd node for repair. Kubernetes cluster should suffer no hiccups.
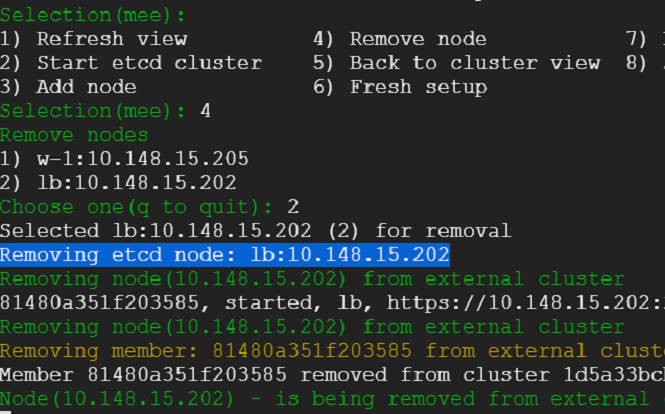
21) There has been no hiccups for the cluster as we can see from the kube system pods. Embedded etcd cluster is still running but api servers are not pointing at them. They will have nothing in them - because when the disaster struck - they were hollowed out.
22) Node repaired. Lets add it back to the cluster again.
23) Repaired node has become a member of the cluster again.
24) Lets bring the embedded etcd cluster back to live. We go back to snapshots view, select embedded cluster as restore target.
25) We see that our embedded cluster is back - and system pods are back too.
26) Our nginx pod should be back on the default namespace. Lets check that.
This effortless switch between two environments using snapshots opens the door for lot of use cases - disaster recovery, cluster replication, fail over, rapid development and testing, preview releases to just name a few.
What about the situation - where we have just restored a snapshot but would like to go back to the previous state we were in? Well, we would definitely take a backup snapshot before migration - and use that as fallback option. But in reality - snapshot always takes us to a new state - it creates new data directories, new configurations - its not exactly the same setup as before.
But we want to go back to the exact setup - we were in. Can we do that? Of course we can. We would need o manually alter settings and configurations. That would involve rounds of testing and verification. That is going to be error prone and not hassle free. Well, freedom from hassle is what k8s-kube-switch strives for.
As it turns out, these scripts can help us to go back to not only the previous state, but any previous state. As said, when we are restoring a snapshot, we are creating new restore paths and configurations and moving on to them - whether it is embedded or external etcd. We are leaving behind a trail of data directories and configurations. What it does is - any time we restore a snapshot, it looks at current settings and data directories across nodes and backs them all up in a single archive and saves it (Where? Currently underneath a directory called kube_vault - in the node where k8s-kube-switch runs. These archives can be easily be pushed to a safe storage and duplicated to prevent data loss).
We have not talked about states so far. States is the the mechanism that helps us to go back to any last good state. But it has challenges of its own. We are good if cluster topology remains same. We can just spread out the archived state across the nodes and resume etcd and kubernetes api servers. But what if nodes leave or new nodes are added to the etcd cluster? As we know - etcd does not like it if a node does not leave the cluster in good terms - it will not bury that hatchet otherwise. And talk of adding a node surreptitiously to the cluster - you have to dance a new dance to calm etcds' tantrums. States is a topic for another post, another day.
We have covered a lot. We started with a fresh cluster setup, taken a snapshot, brought it to its knees, created an external etcd cluster, restored a snapshot on it - brought it to life, taken a node out of the cluster, added it back - and finally switched back the kubernetes cluster to embedded etcd. We have also touched upon states.
Behind all this are a bunch of shell scripts. We can see what they are doing because we are close to the metal. They enable experimentation - We can choose the console option - tweak/improve/cookie cut the scripts to suit our needs - exit the console - refresh the view and see the effects.
Happy experimentation - if you wish.


No comments:
Post a Comment