Gist: Route calls from browser(using grpc-web) to rust grpc application(implemented using tonic), which in turn delegates to java grpc and vice versa.
Note: We use latest versions of various libraries/binaries for this demonstration. One would be well advised to use disposable cloud VMs to carry out the steps demonstrated in this post. Verified for debian buster and various flavors of ubuntu.
Grpc offers many advantages — schema first design enforces well-defined interfaces, protobuf based binary protocol is performant, multiple requests over a single connection, implementation of clients and servers in multiple languages based on language specific artifacts generated by protoc compiler, bi-directional streaming etc.
In this post, however, we stick to a simple example of request and reply since our focus is on connectivity between different pieces. Following figure captures the request and response flow:

Note: It will help to clone the following GitHub project to follow along the steps described:
git clone https://github.com/ratulb/grpc-rust-java-web.git
Part 1: java and rust grpc connectivity
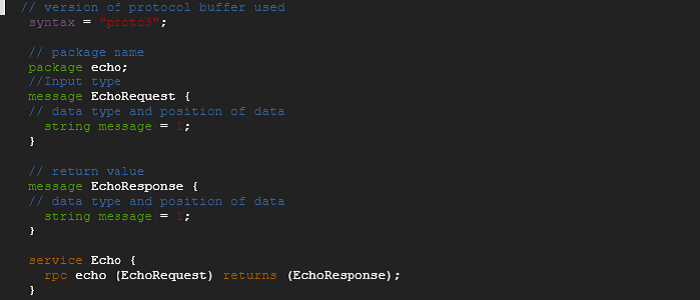
- Following is the protobuf interface definition that rust/java/grpc-web use to generate language specific protocol buffer artifacts, clients and services
2. We implement the rust service first. We assume that rust is already installed.
3. We create the rust grpc server implementation within ../rust/server (refer to https://github.com/ratulb/grpc-rust-java-web/tree/main/rust/server).
cargo new server
4. We create a new folder called ‘proto’ inside the ‘server’ project created above and place the protobuf definition file ‘echo.proto’ inside that.
5. There are multiple grpc frameworks available in rust. We use tonic as rust grpc framework because of its feature completeness, contributor count and production readiness. Hence we edit the Cargo.toml file to include tonic with its dependencies.

6. To trigger the protobuf code generation we need to add a file named ‘build.rs’ inside the server folder with the following content.

7. At this point, we are ready to build the project. We run ‘cargo build’. Post build, we find that there is a echo.rs file generated inside the target directory.
![]()
8. We add a src/echo.rs with content of the file as shown below:
tonic::include_proto!(“echo”);
9. Next we modify the src/main.rs file with content shown as below:
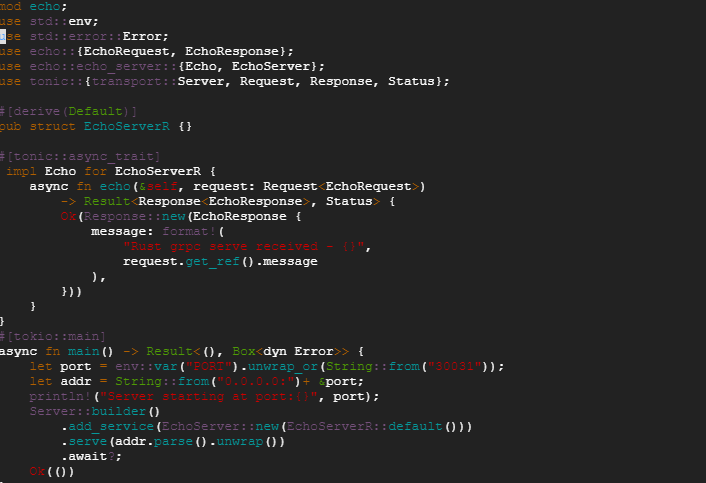
Note: The the content of https://github.com/ratulb/grpc-rust-java-web/blob/main/rust/server/src/main.rs file differs from the one shown above. That is because — once the rust grpc server receives a request — it will try to pass on the request to a java delegate if registered. Also, we need to make sure there is no endless delegation cycle. The rust implementation uses grpc request headers and the java implementation(https://github.com/ratulb/grpc-rust-java-web/blob/main/java/server/src/main/java/grpc/java/server/EchoServer.java) uses request header along with request interceptor to break the cycle.
10. At this point — we are ready to launch rust grpc server implementation by running “cargo run”.
11. Our rust server should be running at this point. We would be using ‘grpcurl’ to invoke the server.
12. We run the “grpc-curl.sh” script as shown below:
./grpc-curl.sh 0.0.0.0:30031
13. We should get back a response from the server.
14. At this point we should be able navigate to the ./rust/client folder and run the rust client implementation(https://github.com/ratulb/grpc-rust-java-web/blob/main/rust/client/src/main.rs) as shown below:
cargo run or just call ./run.sh
15. At this point — we should be able to navigate to ./java/server/ and ./java/client/ folders and run the ‘run.sh’ script in respective folders.
16. If both rust and java grpc servers are running — then running rust client should get a response from the java grpc server and vice versa — this would mean that rust and java grpc connectivity is working as expected.
Part 2: Envoy proxy
Note: Rust and java grpc do not need envoy proxy to connect to each other. They talk proper grpc which makes use of HTTP2 as the underlying transport protocol. We are just setting things up for what is coming next- Grpc-web.
- Navigate to ./envoy folder and run ‘./setup.sh’ - this would install envoy proxy locally.
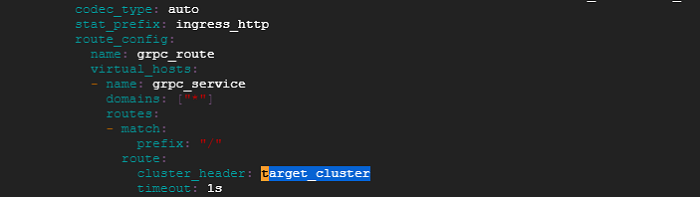
- Next run ‘./runs.sh’. Envoy would start listening at port 10000. Envoy is configured to route request based on a request header called “target_cluster” . So grpc payload to envoy should carry the request header called “target-cluster” as part of grpc request metadata. Later we would see that grpc-web client is sending this header from the browser request. Based on the grpc request metadata header, the incoming request is routed to upstream rust or java grpc server.
3. For now we can navigate to ./java/server or ./rust/server folder and execute the ‘grpc-curl.sh’ script. We should be able to get a response back because these scripts are configured to send the target_cluster request header as shown below:

4. So far we have made sure that if we can deliver a grpc request payload to the envoy listening address, the request would be answered by either java or rust grpc server. Next, we would look at sending a grpc request from the browser.
Part 3: Grpc-web
As things stand currently, the browser does not talk grpc (though it supports HTT2 - and remember grpc != HTT2 ). Also, the browser does not expose APIs with enough control for request manipulation and make outgoing grpc request. So — that’s where grpc-web comes in — it is a JavaScript client library that facilitate connectivity between a browser application and grpc server. but grpc-web does not talk proper grpc either. It talks in terms of a protocol which makes it easy to change the conversation into proper grpc — which is what is done by the envoy proxy (by making use of a filter — “envoy.filters.http.grpc_web” —in ./envoy/envoy.yaml & ./envoy/envoy-local.yaml).
The overall process of making a grpc application available in the browser is as follows:
a) Generate JavaScript protobuf message classes and client stub for the client using protoc compiler from protobuf definition file.
b) Compile all the required libraries along with generated protobuf message classes and stub into one javascript library compatible with browsers. This can be achieved using tools like “browserify”, webpack etc. Optionally, we can minify the the compiled library. We are using webpack in this example.
c) Host client app(index.html) in a webserver (tomcat in our example).
d) Set up a proxy (envoy proxy) to intercept grpc-web request from the browser. Delegate the intercepted request to grpc server, gather response and send it back to the browser.
Detailed steps:
Note: We are using NodeJS packages npx and webpack-cli along with dependencies to compile required libraries and protobuf message classes and client stub into one single library. That’s why the installation of NodeJS and the dependencies.
- Navigate to ./web folder and run the ‘./install-protoc.sh’ script — This would install ‘protoc’ and ‘protoc-gen-grpc-web’ required for generating javascript protobuf message classes and client stub from the protobuf definition.
- Next, run the ‘./gen-js-proto.sh’ script. This would compile the proto/echo.proto definition and generate two output files — namely ‘echo_pb.js’ and ‘echo_grpc_web_pb.js’. We are using definitions from these two files in ‘client.js’.
- Change the IP address in line 9 of ‘client.js’ to that of envoy proxy IP(if required). The javascript function “main” defined in client.js is being used in index.html. Note: IP address change is not required — if everything is running locally.
- We are using NodeJS npx and webpack-cli along with dependencies to compile required libraries and protobuf message classes and client stub into one single library. Execute the “./setup-node-wp.sh” script install NodeJS and dependencies.
- We would need a webserver to host our grpc-web client app(index.html). Navigate to ./web/tomcat/ directory and run ‘./setup.sh’. This would install tomcat server.
- At this point, we are ready to deploy our client app(index.html) to tomcat server. We navigate to ./web folder and run “./deploy-app.sh”. This would compile all the javascript files into one single ./web/dist/main.js file followed by copying resources to ./web/tomcat../webapp/client directory.
- At this point, we can navigate back to the project root folder and execute ‘./run.sh’. This would run rust and java grpc servers and tomcat and envoy proxy. We should be able to access the webpage at http://IP:8080/client (http://127.0.0.1:8080/client -if running locally) -where the IP is the address of the tomcat server ip address.
- Browser should display a page as shown below. We should be able to select rust or java from the the drop down and call the grpc servers.
