The gist: Can gcp/azure/AWS can be squeezed into one machine?
Openstack is a cloud provider framework(read GCP/AWS/Azure - except that it is opensource). Here we squeeze the whole storage/compute/network virtualization framework to one GCP instance - create tenant, provision VMs and create a kubernetes cluster out of those VMs and deploy PODs.
Provisioning the compute engine:
Not all compute engines support virtualization - we need to create them from disks which are tagged specifically to support virtualization and we need to provision the compute engines on N1(Haswell) and later series of CPUs and these CPUs are not available in all the GCP regions. At this point - US central and some Europe regions have N1 series of CPUs. See my earlier post on how to do this.
Create the disks in the GCP cloud console:
We execute the the following command in the google cloud console to create a disk that would support virtualization:

$gcloud compute disks create disk-tagged-for-virtualization --image-project ubuntu-os-cloud --image-family ubuntu-1804-lts --zone us-central1-a --licenses "https://www.googleapis.com/compute/v1/projects/vm-options/global/licenses/enable-vmx"

This would create a 10 GB disk - which can be resized as per our requirements. In this case we resize it to 120 GB to launch our ubuntu 18.04 bionic compute engine VM. Inside this VM we would deploy Openstack using Devstack. So, whole Openstack deployment would be contained within one compute engine with 6 vCPUs, 16 GB RAM and 120 GB hard disk.
Within the Openstack deployment, we would launch 2 ubuntu 18.04 VMs - one would be the master node and another would be worker node of the kubernetes cluster. Both nodes would be 2 vCPU and 20 GB hard disk each. We would deploy weave CNI network plugin for POD networking and would validate that POD connectivity works without any hiccups. Would check for POD port forwarding, expose a deployment as NodePort and check for NodePort service accessibility. We would also, validate kubernetes DNS by going inside POD a container and access other containers by POD DNS names.
Disclaimer:
This is not an advisable production setup and compute and storage capacities are not based on any benchmark. This could be a POC, academic exercise or a guide for someone looking to get started with Openstack and hack its internals from there. We could have taken nesting and virtualization levels deeper just by making use of Linux lxd containers because ubuntu has in-built support for them. But that is a post for another day.
Following are the snaps of the provisioned GCP compute VM based off of the disk that we have created above.

We have selected N1 series of CPU and US central region for required virtualization support. We have appropriately named the compute engine 'openstack'(pun intended)!


There are various ways we can deploy Openstack. But here we are going to use 'devstack' - which facilitate single or multi-node deployment of Openstack. Devstack is collection of scripts used to bring up a complete Openstack setup quickly. The whole setup is triggered by a script 'stack.sh'. It pulls down various components of Openstack from GitHub source code repository mirrors, configures the system and makes it ready. Hence, Devstack is a natural choice to get started with Openstack. Below is quick rundown of various openstack core infrastructure components:
Dashboard:
Web-based management interface of openstack. Also, interchangeably referred to as horizon, it is an intuitive UI to create, configure and manage various components and services that a cloud framework must provide - such as control, compute, network and storage. More specifically, horizon is a core UI infrastructure based on which component specific management UIs are built and the dashboard stiches them together.
Note: API and CLI exploits are there underneath to execute the tasks that are performed on the dashboard. The dashboard piggy back on the APIs.
Keystone:
The identity management component that handles user, roles, tenants. Also, manages catalog of services and service endpoints. One thing to notice is that - in Openstack parlance - tenants and projects mean the same thing. Operations are executed in a project or tenant context. Once openstack setup is complete, two users 'admin' and 'demo' will be present in the system. Admin is the super user over the whole cloud setup.
Glance:
Glance is the OS image registry. The Glance is the VM image management component. Before we launch a VM we need to make M boot images will get their authorized host key(to access them via SSH) and network device MAC address populated during the cloud initialization phase of VM launch.
Neutron:
Neutron is responsible for virtual networking in Openstack. It exposes APIs to manage the software defined tenant networks(SDN) to which VMs are launched. Neutron provides inter-network connectivity via virtual routers. External connectivity to internal VMs can be provided if a router is has a gateway that is connected to an external network. VMs can be accessed via floating IPs which have direct one-to-one with VMs' internal IPs.
Nova:
Nova manages the VM instances. Once a VM image is available in Glance and a virtual network is defined, with the addition of SSH key pair (which can either be generated or imported) and security group (which controls VM's ingress and egress traffic), Nova looks at the hypervisor resources and schedules a VM on a compute node. Once the VM is launched, the public key of the SSH key pair is injected into the authorized_keys file of launched VM during the cloud initialization phase.
Cinder:
Cinder is the component for block storage management. It manages the volumes that get attached to and detached from VMs. Cinder works with glusterFS, ceph and many more solutions.
Swift:
Swift is the object storage in Openstack. It is analogous to AWS S3.
Ceilometer:
Originally designed for tenant resource consumption billing purposes, it is the telemetry component of openstack. Its provides resource usage statistics and can be configured for alert and monitoring.
Now that we know what core components of openstack are, let get started with the first up.
Setting things up:
We SSH into our provisioned GCP instance called 'openstack'. First thing, we do is create an user called 'stack' with home directory set to /opt/stack. This is done because devstack scripts are required to be executed by the 'stack' user.
We update the system, create the 'stack' user, login as stack and checkout the latest stable release 'victoria' of Devstack repo.
$ sudo su -
root@openstack:~# apt update
root@openstack:~# apt upgrade -y
root@openstack:~# useradd -s /bin/bash -d /opt/stack -m stack
root@openstack:~# echo "stack ALL=(ALL) NOPASSWD: ALL" | sudo tee /etc/sudoers.d/stack
root@openstack:~# su - stack
stack@openstack:~$ cd devstack/
Replace the HOST_IP below as necessary.
At this point, we create local configuration file as follows:
stack@openstack:~/devstack$ ./stack.sh
The above script will install Openstack and related dependencies, configure the components with each other and setup a single node running Openstack cloud framework for us. Successful deployment will have output similar to the following at the command prompt:
At this point, we can access the horizon dashboard using the external IP address of compute engine from our local machine.

1. We access the the horizon dashboard using the external IP.

2. Next, create an user call 'dev' with role 'member'.

3. We create a project called 'dev-project' for the user.

4. We complete the user creation along with project creation and logout and login as dev.
At this point we have provisioned a tenant. We should able to upload a VM image (ubuntu 18.04 cloud image), define virtual network, generate SSH key pair, create a security group. These are the requirement for launching a VM.

5. First we download ubuntu 18.04 bionic image to our local machine from this link. See this page for details.
In case download or upload taking long time - we can download the image on the
compute engine itself and upload the image to the system by using the CLI. Fire the following commands from /opt/stack/devstack directory:
stack@openstack:~/devstack$ source openrc dev dev-project
If we use the CLI to upload the image, we ignore step 6.
6. Next we upload the image:

7. Now image listing should show our image.

8. Next we, create the security group called 'dev-security-group'.

We add 3 rules -
- All ICMP
- All TCP
- SSH

9. Next, we create the SSH key pair called 'dev-key-pair'.

We save the downloaded private key in a file called 'dev-key-pair.pem' in the compute engine.
We change the permission on the dev-key-pair.pem by executing the following command:


12. Enter the subnet allocation details and DNS address 8.8.8.8

13. At this point we have an internal network without any external connectivity. We would connect this internal network to the public network which was provisioned as part of openstack deployment. To do this we would create a router called 'dev-router' which would stitch together public and dev-network. This would provide external connectivity from the internal network.

14. We add the internal 'dev-network' as an interface to the router.

15. Current network topology.

At this stage we are ready to get on with the VM launch process. We would first create a VM named master - select the uploaded ubuntu image, associate the dev-network, dev-key-pair, dev-security-group and finally launch the VM.
16. VM named 'master'.

17. Next we select the ubuntu image.

18. Next we select m1.small flavor with 2 GB RAM and 20 GB hard disk.

19. We select the dev-network.

20. We select the dev-security-group.

21. Select the dev-key-pair.

22. We follow the same procedure to another VM called 'worker'. We see both instances are running.

23. Lets try to open the console of the master.

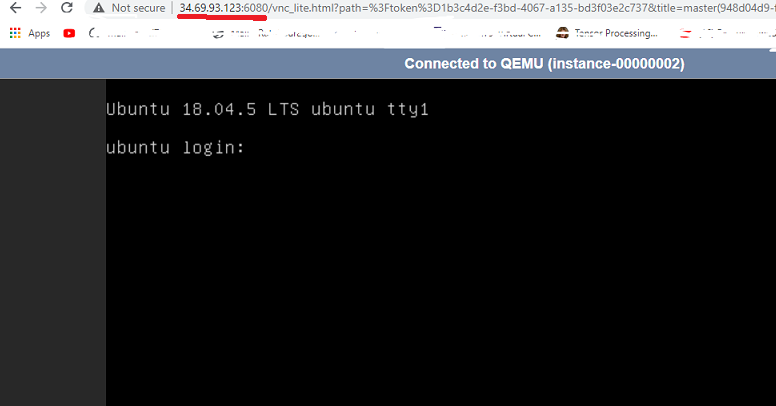
We don't get to see the console. Hovering over the 'Click here to see only the console' - we find that the link is pointing to the internal IP of the compute engine at port 6080.
We would need to open firewall port 6080 on the compute engine and also we replace the internal IP with the external IP of the compute engine to open that link.
24. Open the firewall port 6080 of the compute engine.

25. We access the master VM console.
26. Master has got an internal IP of 192.168.0.61. Let's ping that from the compute engine. Ping does not go through.
That's because we cant not ping the internal IP.
27. For accessing the VMs we would need to assign floating IPs to the VMs. Floating IP provides an one to one external mapping to a VM. Lets assign floating IPs to them.


28. VMs with floating IPs assigned.

29. At this point we should be able to ping the VMs and SSH into them using the floating IPs.
30. We are able to ping them. Lets SSH now.
31. We are now inside both the VMs. We would update them and get on with process of setting up the kubernetes cluster. We run the following commands in both the VMs.
32. Next we would install kubernetes - we do not install kubectl on the worker node.
root@master:~# sudo apt update
root@master:~# apt update
On the master only:
root@master:~# apt install -y kubelet kubeadm kubectl
On the worker
root@worker:~# apt install -y kubelet kubeadm
Again on both VMs.
33. We are now done with kubernetes installation. Lets initialize the master and then join the worker to the cluster. We avoid the pre-flight check errors because the settings we have chosen are not optimum for the cluster and kubernetes is not very happy about that.
root@master:~# kubeadm init --ignore-preflight-errors=all

We copy the kube config to the home directory as instructed and proceed to the worker node and execute the join command.


34. Lets fire the following command.
The nodes are not ready - that's expected - because we have not deployed CNI plugin yet. Lets do that next.
35. Install weave POD network plugin.
36. Let's check the nodes again.
Cluster is finally ready! Next we deploy a nginx pod.
37. Deploy nginx pod.
We see that pod is running.
38. Let's port-forward to the pod in another terminal and curl it from current terminal.

Port forward is working fine.
39. Lets create create a NodePort service and access it from the cluster nodes.
First we create the deployment:
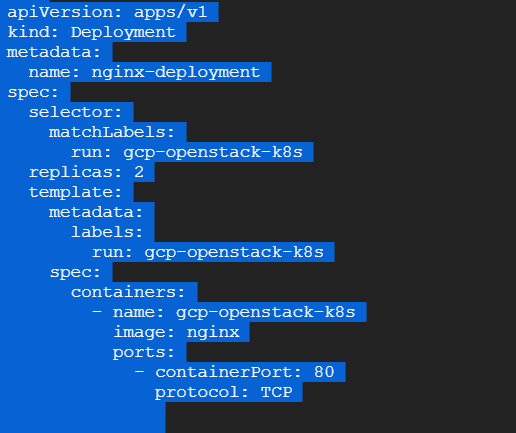
We deploy the above deployment yaml.


40. Now, lets access it from the worker node.

41. Let's access it via the floating IP.

We can access the NodePort via floating IP too.
42. Next, let go inside a POD container and check if other PODs are available via kube DNS.

As expected, kube DNS access is working fine.
Conclusion:
At the heart of cloud computing is virtualization. It combines storage, compute and network virtualization. Here, in this exercise, we used a google compute engine, which itself is virtual machine and we deployed whole openstack network, storage and compute virtualization framework, provisioned two ubuntu VMs, launched a kubernetes cluster, deployed PODs and everything works! As mentioned in the beginning, we could have taken this nesting and virtualization much further but this has been already long post. We stop here for today.
Lastly: The CLI version of this can be found at github - which is a hassle free way of achieving the whole thing by running couple of scripts. Following is a snap of the same.

No comments:
Post a Comment